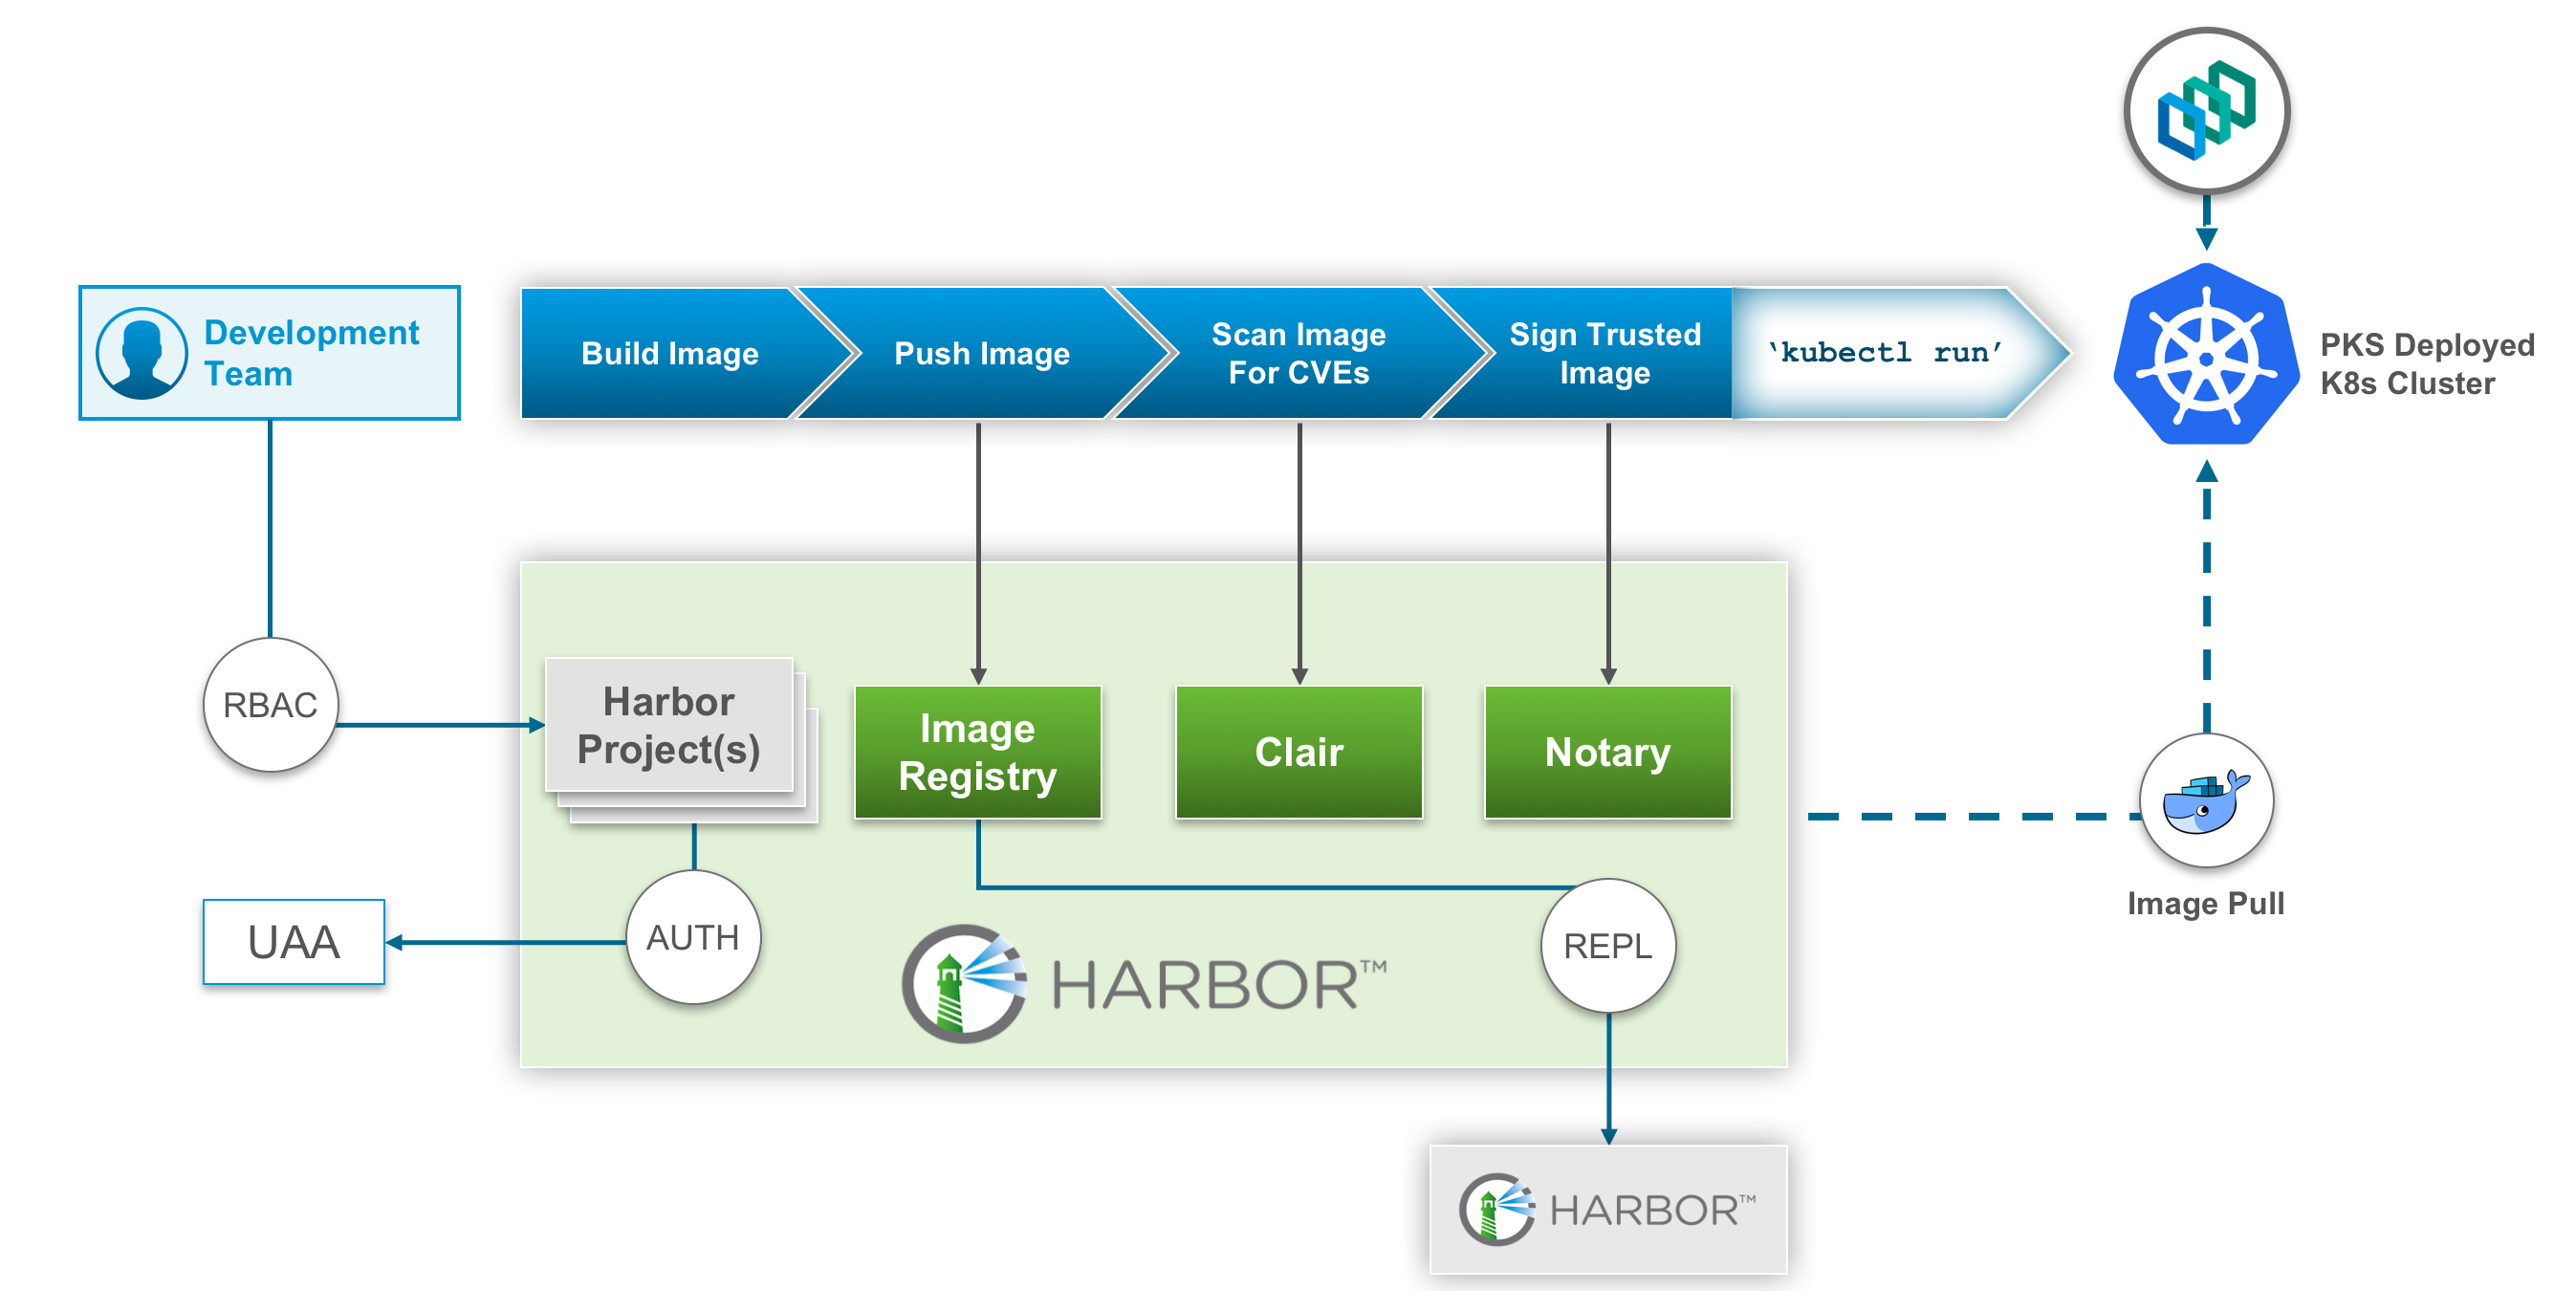
Harbor介绍 Harbor是VMware公司开源的企业级Docker Registry项目,其目标是帮助用户迅速搭建一个企业级的Docker私有镜像仓库。Harbor基于官方Registry V2实现,提供了管理UI,基于角色的访问控制,LDAP集成、镜像复制、以及审计日志等企业用户需求的功能。
图形化用户界面 用户可以通过浏览器来浏览、检索Docker镜像仓库,管理项目。基于角色的访问控制 按项目对Docker镜像进行组织,可以按项目对用户授权。镜像复制 镜像可以在多个Harbor实例之间复制。镜像复制可以很好的应对多云、多数据中心的场景。LDAP支持 Harbor可以集成企业内部AD/LDAP,方便统一进行用户管理。审计管理 所有针对镜像仓库的操作都可以被记录追溯,用于审计管理。
另外,Harbor也可以对上传的镜像进行漏洞扫描和签名,新版的Harbor也加入Helm仓库的功能。
先决条件 Harbor 有多个Docker容器组成,可以部署在任何支持Docker的Linux发行版上。目标主机需要安装Python、Docker、Docker Compose。
硬件
资源
最小配置
建议配置
CPU
最小 2 CPU
建议 4 CPU
Mem
最小 4GB
建议 8GB
Disk
最小 40GB
建议 160GB或更多,根据上传的镜像多少决定
软件
软件
版本
描述
Python
2.7版或更高
Docker engine
1.10版或更高
Docker Compose
1.6.0版或更高
Openssl
首选最新版
为Harbor生成证书
网络端口
端口
协议
描述
443
HTTPS
Harbor Portal 和 core API 使用此端口对外提供服务
80
HTTP
Harbor Portal 和 core API 使用此端口对外提供服务
升级操作系统到最新版本 操作系统我们选择 CentOS 7 最新版(7.6.1810),如果不是最新版,可参考如下升级到最新版。
按如下内容,编辑 /etc/yum.repos.d/CentOS-Base.repo
1
2
3
4
5
6
7
8
9
10
11
12
13
14
15
16
17
18
19
20
21
22
23
24
25
26
27
28
29
30
31
32
33
34
35
36
37
38
39
40
41
42
43
44
45
46
# CentOS-Base.repo # # The mirror system uses the connecting IP address of the client and the # update status of each mirror to pick mirrors that are updated to and # geographically close to the client. You should use this for CentOS updates # unless you are manually picking other mirrors. # # If the mirrorlist= does not work for you, as a fall back you can try the # remarked out baseurl= line instead. # # [base] name=CentOS-$releasever - Base #mirrorlist=http://mirrorlist.centos.org/?release=$releasever&arch=$basearch&repo=os&infra=$infra baseurl=http://mirrors.163.com/centos/7.6.1810/os/$basearch/ #baseurl=http://mirror.centos.org/centos/$releasever/os/$basearch/ gpgcheck=1 gpgkey=file:///etc/pki/rpm-gpg/RPM-GPG-KEY-CentOS-7 #released updates [updates] name=CentOS-$releasever - Updates #mirrorlist=http://mirrorlist.centos.org/?release=$releasever&arch=$basearch&repo=updates&infra=$infra baseurl=http://mirrors.163.com/centos/7.6.1810/updates/$basearch/ #baseurl=http://mirror.centos.org/centos/$releasever/updates/$basearch/ gpgcheck=1 gpgkey=file:///etc/pki/rpm-gpg/RPM-GPG-KEY-CentOS-7 #additional packages that may be useful [extras] name=CentOS-$releasever - Extras #mirrorlist=http://mirrorlist.centos.org/?release=$releasever&arch=$basearch&repo=extras&infra=$infra baseurl=http://mirrors.163.com/centos/7.6.1810/extras/$basearch/ #baseurl=http://mirror.centos.org/centos/$releasever/extras/$basearch/ gpgcheck=1 gpgkey=file:///etc/pki/rpm-gpg/RPM-GPG-KEY-CentOS-7 #additional packages that extend functionality of existing packages [centosplus] name=CentOS-$releasever - Plus #mirrorlist=http://mirrorlist.centos.org/?release=$releasever&arch=$basearch&repo=centosplus&infra=$infra baseurl=http://mirrors.163.com/centos/7.6.1810/centosplus/$basearch/ #baseurl=http://mirror.centos.org/centos/$releasever/centosplus/$basearch/ gpgcheck=1 enabled=0 gpgkey=file:///etc/pki/rpm-gpg/RPM-GPG-KEY-CentOS-7
升级系统并重启
1
2
$ yum update -y $ reboot
关闭SELinux,编辑 /etc/sysconfig/selinux,设置 SELINUX=disabled
安装 Docker 安装依赖包
1
2
3
$ sudo yum install -y yum-utils \ device-mapper-persistent-data \ lvm2
添加docker官方仓库
1
2
3
$ sudo yum-config-manager \ --add-repo \ https://download.docker.com/linux/centos/docker-ce.repo
查看Docker可用版本
1
2
3
4
5
6
7
8
9
10
11
$ yum list docker-ce --showduplicates | sort -r docker-ce.x86_64 3:18.09.5-3.el7 docker-ce-stable docker-ce.x86_64 3:18.09.4-3.el7 docker-ce-stable docker-ce.x86_64 3:18.09.3-3.el7 docker-ce-stable docker-ce.x86_64 3:18.09.2-3.el7 docker-ce-stable docker-ce.x86_64 3:18.09.1-3.el7 docker-ce-stable docker-ce.x86_64 3:18.09.0-3.el7 docker-ce-stable docker-ce.x86_64 18.06.3.ce-3.el7 docker-ce-stable docker-ce.x86_64 18.06.2.ce-3.el7 docker-ce-stable docker-ce.x86_64 18.06.1.ce-3.el7 docker-ce-stable docker-ce.x86_64 18.06.0.ce-3.el7 docker-ce-stable
安装Docker CE
1 $ sudo yum install -y docker-ce-18.06.3.ce-3.el7
镜像加速配置
镜像加速服务可以使用阿里云的镜像加速服务。注册阿里云的用户后,登录 https://cr.console.aliyun.com ,在管理控制台选择镜像加速服务,可以获取加速地址,然后配置Docker。
1
2
3
4
5
$ vi /etc/docker/daemon.json { "graph" :"/data/docker" , "registry-mirrors" : ["https://xxxxxx.mirror.aliyuncs.com" ] }
启动Docker,并设置开机启动
1
2
$ sudo systemctl start docker $ sudo systemctl enable docker
安装 Docker Compose
确保目标主机上安装了Python 2.7 或更高版本
1
2
$ curl -L "https://github.com/docker/compose/releases/download/1.24.0/docker-compose-$(uname -s) -$(uname -m) " -o /usr/local /bin/docker-compose $ chmod +x /usr/local /bin/docker-compose
安装 Harbor 下载安装程序 Harbor的安装包分为在线版和离线版,离线版包含安装所需的所有镜像,如果你安装的环境不能上网,建议选择这个版本,否则选择在线版安装。
可以到Harbor的发布 下载Harbor的安装程序,在此选择在线版本。
1
2
3
4
$ sudo mkdir /data $ cd /data $ wget https://storage.googleapis.com/harbor-releases/release-1.7.0/harbor-online-installer-v1.7.5.tgz $ tar xvf harbor-online-installer-v1.7.5.tgz
配置Harbor 在harbor.cfg配置文件中包含必填参数 和可选参数 。
设置访问harbor使用的域名和协议:
1
2
hostname = hub.hipstershop.cn ui_url_protocol = https
设置harbor使用的ssl证书:
1
2
ssl_cert = /data/harbor/cert/server.crt ssl_cert_key = /data/harbor/cert/server.key
邮箱相关的配置:
1
2
3
4
5
6
7
email_server = mail.hipstershop.cn email_server_port = 25 email_username = [email protected] email_password = abc email_from = Harbor <[email protected] > email_ssl = false email_insecure = false
Harbor admin账号密码:
1 harbor_admin_password = abc123456
认证相关配置,默认是db_auth:
1
2
3
4
auth_mode = ldap_auth ldap_url = ldaps://192.168.100.100:389 ldap_searchdn = hipstershop\op ldap_basedn = OU=op,DC=hipstershop,DC=cn
使用阿里云的OSS做镜像存储,默认是本地硬盘:
1
2
registry_storage_provider_name = oss registry_storage_provider_config = accesskeyid:xxxxxxxxxx,accesskeysecret: xxxxxxxxxxxxxx,region: oss-cn-beijing,bucket: xin-docker-hub, internal: true
上传SSL证书 创建cert目录并上传SSL证书
1 $ mkdir /data/harbor/cert
为域名申请证书,并上传到/data/harbor/cert,证书文件名:server.crt,私钥文件名:server.key
执行安装脚本
Notray:是一套docker镜像的签名工具,用来保证镜像在pull、push和传输过程中的一致性和完整性。避免中间人攻击,避免非法的镜像更新和运行。
Clair:是coreos开源的容器漏洞扫描工具。harbor很好的整合了Clair,通过简单的UI就可以对上传的镜像扫描,还可以通过每天的定时扫描对所有镜像进行统一扫描。
Chartmuseum:是Helm Charts仓库,用来存储Charts包。
1 $ ./install.sh --with-notary --with-clair --with-chartmuseum
如果一切正常,你可以打开浏览器访问:https://hub.hipstershop.cn ,默认的管理员用户名为:admin,密码:Harbor12345
修改Harbor配置 如下修改Harbor配置配置,比如Job Worker数量,我们需要如下操作:
停掉Harbor服务 1 2 $ /data/harbor $ docker-compose -f ./docker-compose.yml -f ./docker-compose.notary.yml -f ./docker-compose.clair.yml -f ./docker-compose.chartmuseum.yml down -v
修改配置 1 2 $ vi harbor.cfg max_job_workers = 20
执行预备脚本 1 $ ./prepare --with-notary --with-clair --with-chartmuseum
启动harbor 1 $ docker-compose -f ./docker-compose.yml -f ./docker-compose.notary.yml -f ./docker-compose.clair.yml -f ./docker-compose.chartmuseum.yml up -d
日常使用 在浏览器访问 https://hub.hipstershop.cn,输入用户名、密码登录Harbor。
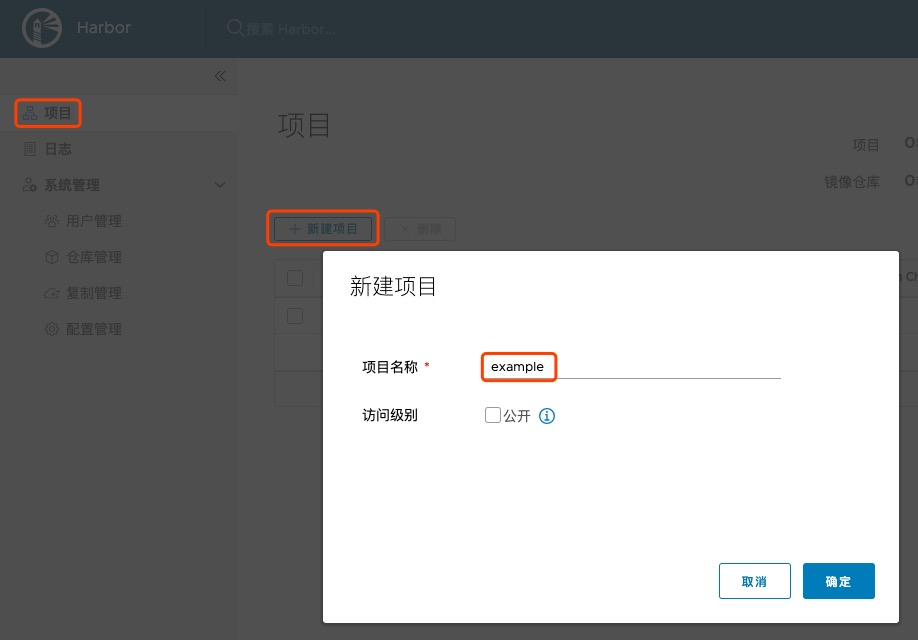
创建项目 点击项目–> 新建项目可以创建一个项目,一个项目可以包含多个镜像。新建一个私有项目,名字为:example。
上传镜像 使用docker命令行工具登录私有仓库并上传镜像到example。
1 2 3 4 $ docker login hub.hipstershop.cn $ docker pull nginx $ docker tag nginx hub.hipstershop.cn/example/nginx:latest $ docker push hub.hipstershop.cn/example/nginx:latest
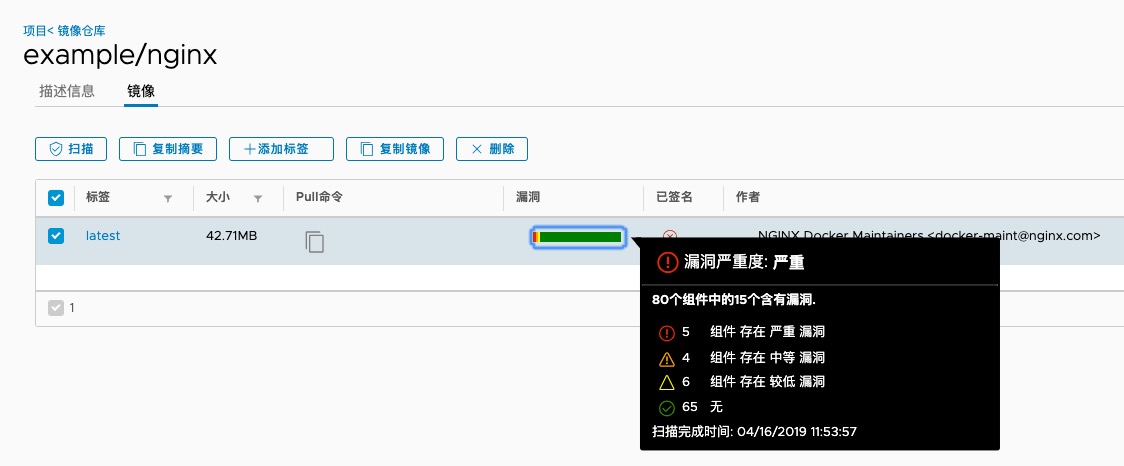
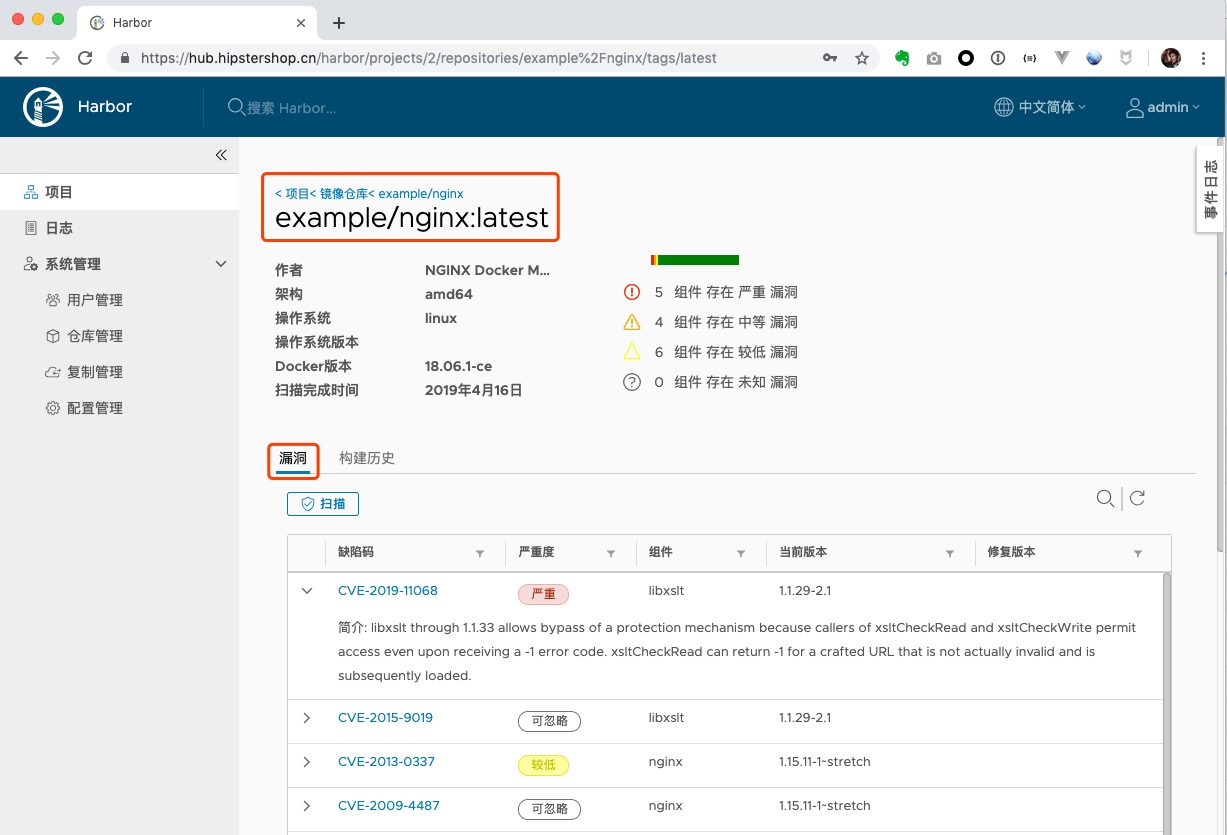
对镜像进行病毒扫描 找到刚刚上传的镜像,然后选择镜像,点击扫描按钮对镜像镜像漏洞扫描。
点击镜像标签,可以看到详细漏洞扫描结果。
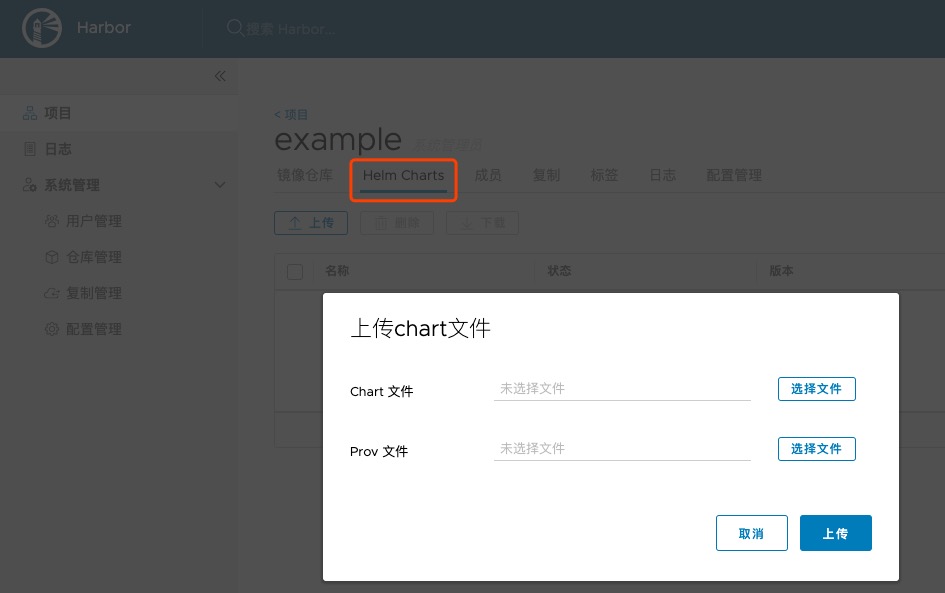
Charts 仓库 Harbor 同时也支持helm charts管理,在此可以上传charts,也可以通过helm push命令行上传。
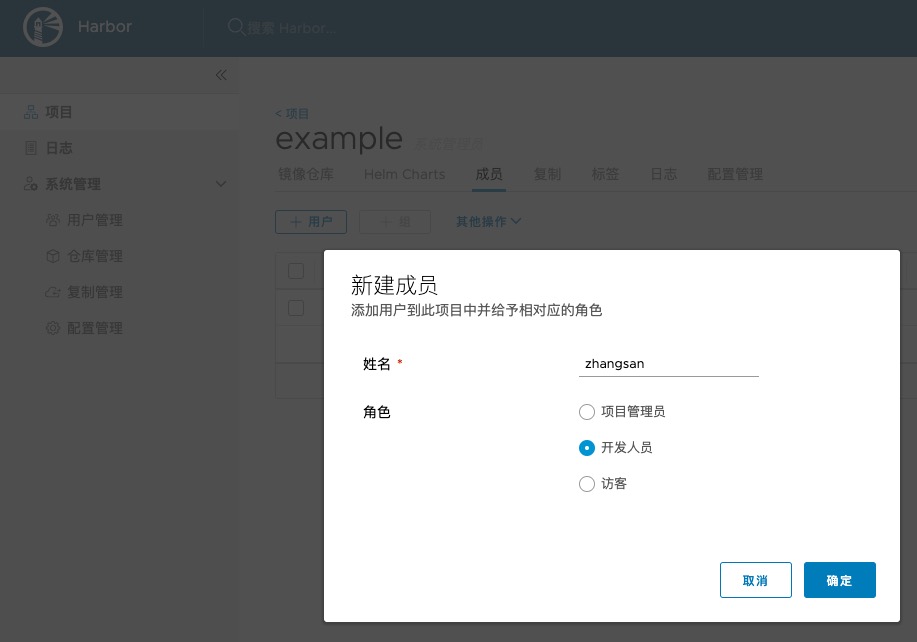
为项目添加成员 为项目添加成员并分配权限,项目管理拥有这个项目的所有权限,开发人员用下这个项目的镜像上传、下载权限,访客仅有下载权限。
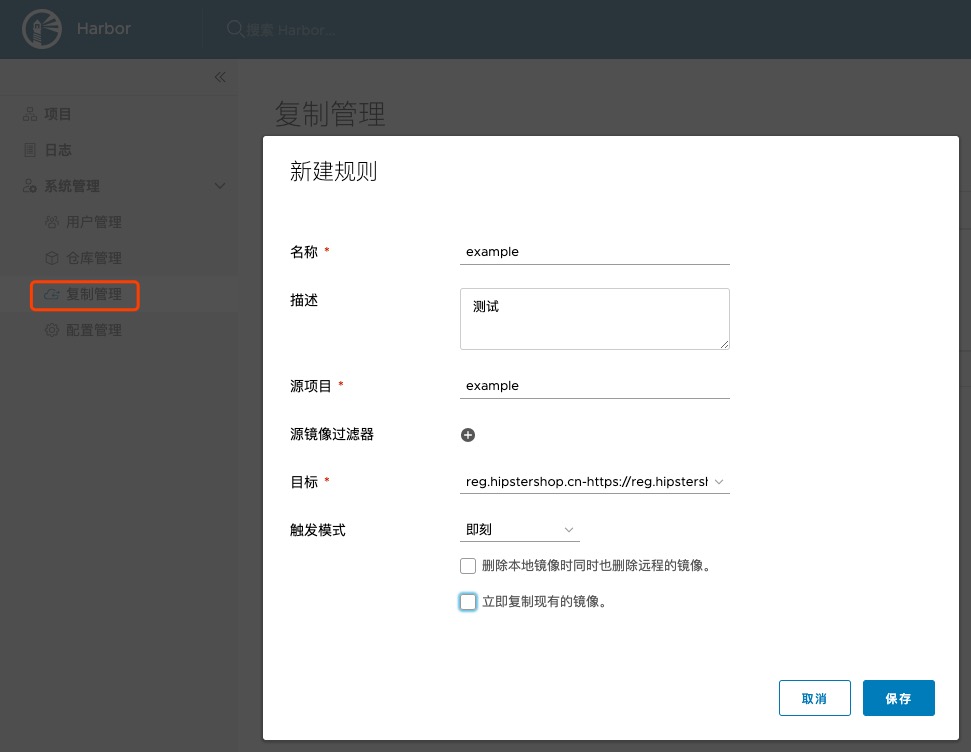
同步镜像到其他远程仓库 如果你有多个镜像仓库,比如多个数据库中心,每个数据中心都有私有仓库,可以使用Harbor的镜像同步功能。
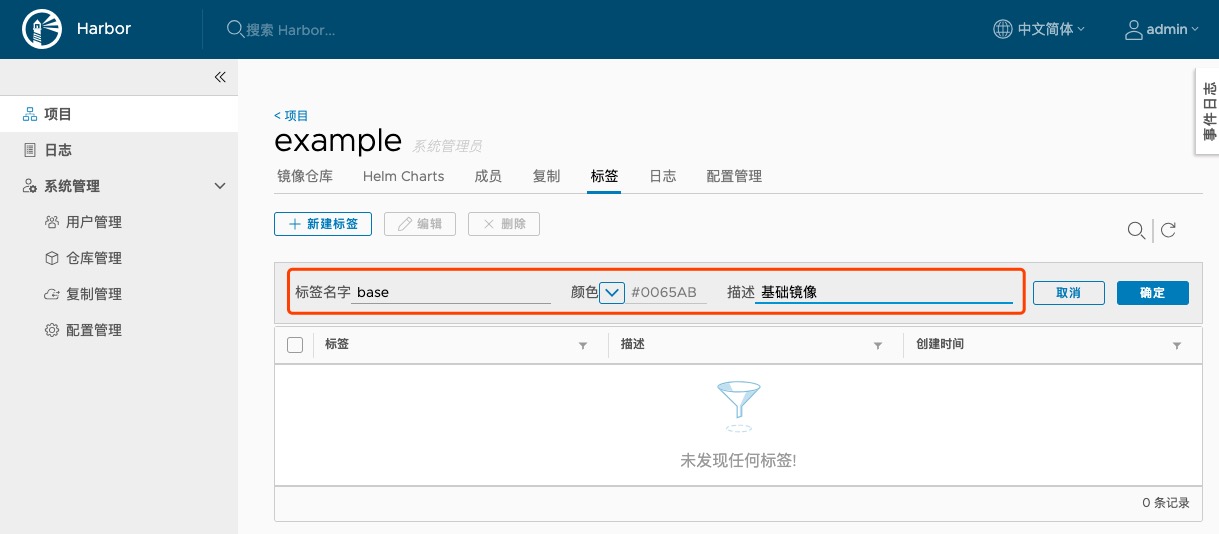
给镜像打标签
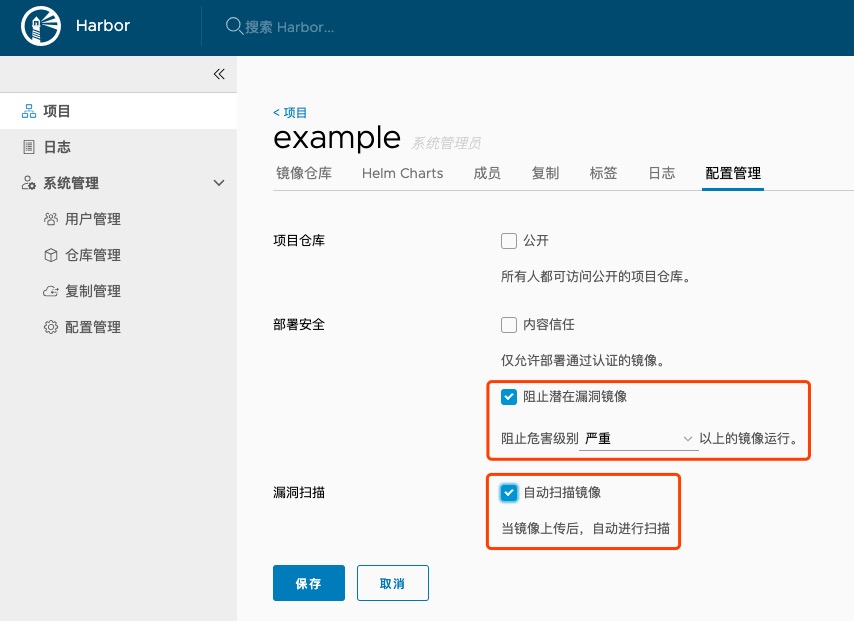
项目配置管理 在项目配置管理选项卡中可以配置项目仓库是否公开,公开的项目仓库可以本任何人访问;部署安全相关配置,比如可以组织高危镜像部署;也可以设置镜像扫描。
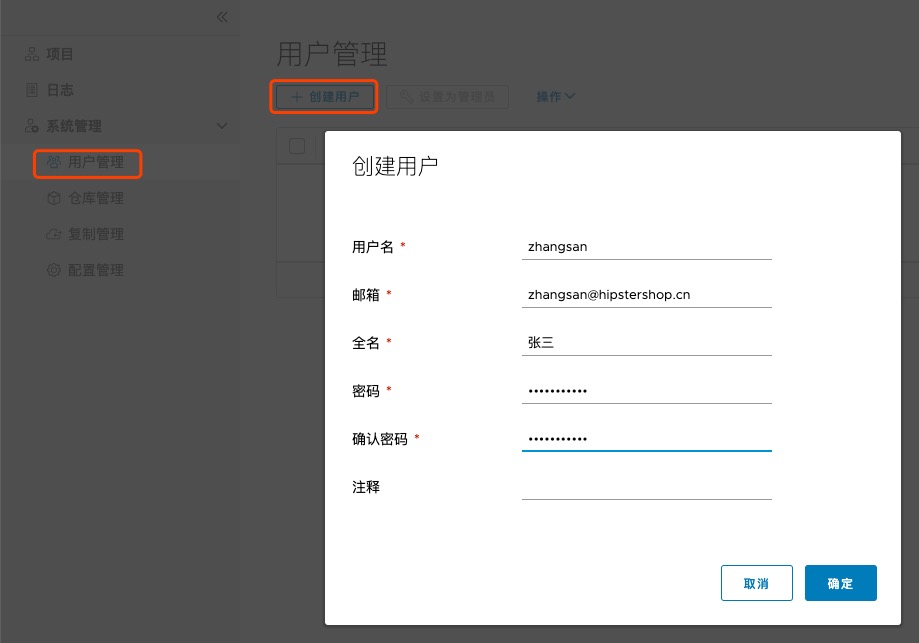
用户管理 在Harbor中添加可以登录系统的用户。
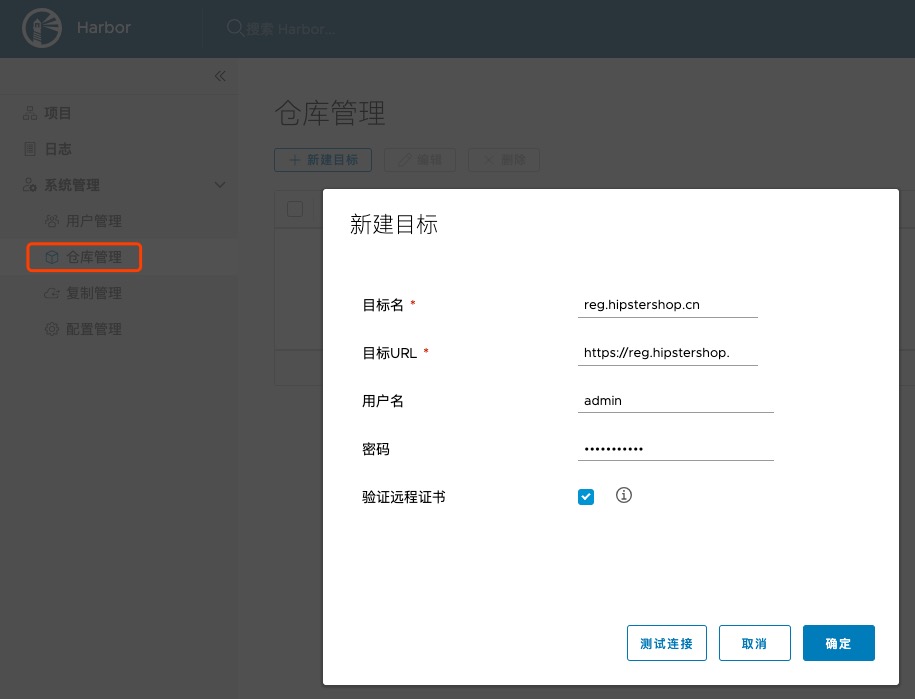
仓库管理 可以添加远程镜像仓库,用于同步本地镜像到远程仓库。
复制管理 可以添加复制规则。
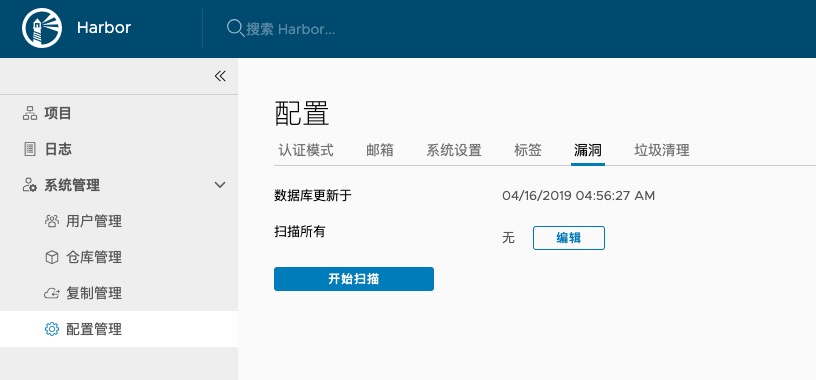
配置管理 Harbor全局配置。在此可以扫描镜像,设置镜像垃圾回收任务。